Last summer I did a workshop on formative assessment tools. Here is a link to that presentation. Recently, Richard Bryne posted a few new assessment tools that are definitely worth adding to your bag of tricks.
Tozzl.com
Tozzl.com is a digital easy-to-to-use platform that enables people to collaborate. Like Padlet and Today's Meet, it allows students to share thoughts, ask questions and respond to prompts. But wait, there's more! With Tozzl teachers have the ability to add hashtags to the mix. Say you're a Social Studies teacher studying the Civil War - add #civilwar to your Tozzl and a feed populates for your students to see. Want students to view a video and respond? Tozzl has a place to upload YouTube links, photos and more. Watch this video for a tutorial.
Plickers
Plickers is a classroom polling system which can display results in real time. The only materials you'll need to get started are paper, a printer, and a smartphone or tablet. Check out this video to see how Plickers can be used in your classroom.
Search This Blog
Monday, April 6, 2015
Tuesday, March 3, 2015
Different First Page Header in Google Docs!
 For those who want to abide by MLA and APA rules, Google
made an update that you’ll want to know about.
Now, you can easily create a first page that has a different header than
the rest of your paper.
Start by creating a new document.
Put whatever header you want on the first page OR leave it blank.
When you get to the second page, double click the header
section, and type your information.
Done!
Friday, February 20, 2015
Track Changes in Google Docs
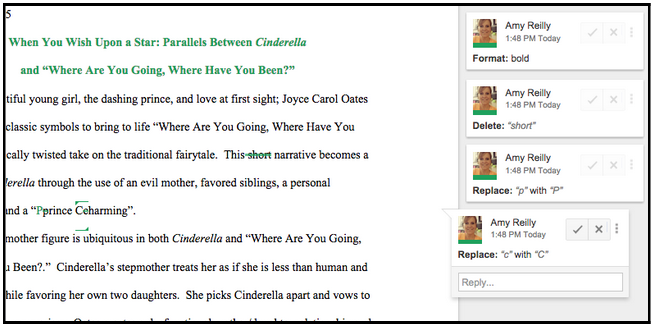
For those who spend any time creating documents online, track changes is a must-have! For collaborative projects, peer edits and more, track changes lets you see the edits that others make to your document. Then, it lets you decide if you want to accept/reject/continue editing them.
Here's how to activate it in Google Docs:
Click on EDITING in the toolbar. Choose SUGGESTING.
Be sure to ask those with whom you're collaborating to do the same thing.
Be sure to ask those with whom you're collaborating to do the same thing.

When you’ve done this, any changes that are made on the document are recorded out to the right. Click the check to accept, the x to delete and the horizontal dots for more revision.
Another great tool available in Google Docs is the SEE REVISION HISTORY tool. Find it by clicking on FILE and choosing it from the menu. This feature allows owners of the document to not only track changes, but the ability to restore a previous version.
This feature is also priceless for teachers who have students working in collaborative groups. It allows teachers to see who has been working on the document, which in turn helps with accountability.
Thursday, February 19, 2015
Padlet: An Oldie But A Goodie
Technology has given students the ability to share information globally. Collaboration opportunities are everywhere, and Padlet is just one way to communicate, express ideas and share information with peers.
Padlet, a user-friendly website is a "wall" where students can post content, thoughts, videos and pictures. It is accessible from any device with an internet connection, so creating or adding to a Padlet can be done any time, anywhere.
Padlets can be shared, embedded, and downloaded into PDFs, Excel sheets and jpegs. And of course, as a huge fan of all things Google, I was thrilled when I found the Padlet Chrome extension, which allows users to share content directly with a wall they have created. That. Is. Awesome! But wait, there's more! With Padlet, you have infinite space. Keep double clicking and the screen will adjust.
Nervous about everyone adhering to proper netiquette which using Padlet? Visibility of the walls you create are completely customizable. In addition, as the administrator of your wall, you can moderate comments and posts.
There are SO many ways to use this tool in the classroom. Below you'll see a Padlet that gives ideas to get you started. Feel free to add!
Wednesday, February 18, 2015
Cool, EASY Online Movie Making Site
There
are a myriad of options when students want to make movies in the classroom.
An easy, FREE option is by using the website Zimmer Twins.
It's a free website (for a regular account) where students can create
quick, 60 second movies. Appropriate for 1st grade and above, students will be engaged and will enjoy being able to make a finished product so quickly. By clicking here, you will find lesson plan ideas and more information for teachers.
Common Sense Media's take on
Zimmer Twins:
This imaginative movie-making site lets users create animated
short films using predetermined characters, expressions, actions, and
backgrounds. Users can fill movie frames with still drawings, speech bubbles,
and transitional words (such as “Meanwhile…”), then string them together to
create their very own custom animated movie. It’s simple to make a movie from
scratch or complete pre-designed starter films.
Here's
an overview on account setup and use:
These technology standards are met with
this project:
ISTE National Education Technology
Standards:
1. Creativity and Innovation- Students demonstrate creative thinking, construct knowledge, and develop innovative products and processes using technology.
2. Critical Thinking, Problem Solving, and Decision Making- Students use critical thinking skills to plan and conduct research, manage projects, solve problems, and make informed decisions using appropriate digital tools and resources.
3. Technology Operations and Concepts- Students demonstrate a sound understanding of technology concepts, systems, and operations.
Want to see an example of a Zimmer Twin learning about the Cotton Gin? Click here.
Friday, January 9, 2015
Making YouTube Videos on the Fly
I am in a tech integration workshop, my monthly therapy, and learned that by going to YouTube, clicking on UPLOAD once you've logged in to your account, you can make a video on the fly. Once there, you can choose RECORD VIDEO and boom - you're recording! *Note: it starts recording RIGHT AWAY (no countdown) so be prepared. This is super cool and has a ton of possibilities. Try making one today and share in the comments below.
Thursday, January 8, 2015
Google Classroom Tutorial
In an effort to reach more staff for professional learning, this month's Tech Wednesday went digital with a webinar introducing Google Classroom to those who have yet to use it.
Tuesday, January 6, 2015
AirScanner: A Handy Tool
 AirScanner is a handy tool that, quite honestly, I didn't even remember downloading. I tend to hit places like Appsgonefree to download apps that look promising. I'm glad I chose this one.
AirScanner turns your cell phone into a document camera. Why is this great? Well, typically the document cameras in teachers' rooms are wired and must be plugged in to the computer. This is a wireless version. This is a fantastic tool to use when you want to show hard copies of documents, newspapers, magazines and more. In addition, it's a great way to showcase student work. Since you're no longer tied to your wired document camera, you can show images, manipulatives and other student produced items as they are working. Pretty neat, right?
How To
After downloading the app:
- Start Air Scanner
- See the numbered IP address at the bottom of your camera display (looks something like this - 192.168.0.5:8283)
- Open your browser (Chrome, Safari, Firefox) on your computer and type in the IP address EXACTLY as it's shown.
You're on your way!
It can be a tad laggy (taking about 2 seconds to show the image), but it's definitely worth a look. At .99 cents, it's very reasonable or you can haunt AppsGoneFree until it comes around again. Download it here for iOS.
Subscribe to:
Comments (Atom)

 Next, go to INSERT and choose HEADER.