Last summer I did a workshop on formative assessment tools. Here is a link to that presentation. Recently, Richard Bryne posted a few new assessment tools that are definitely worth adding to your bag of tricks.
Tozzl.com
Tozzl.com is a digital easy-to-to-use platform that enables people to collaborate. Like Padlet and Today's Meet, it allows students to share thoughts, ask questions and respond to prompts. But wait, there's more! With Tozzl teachers have the ability to add hashtags to the mix. Say you're a Social Studies teacher studying the Civil War - add #civilwar to your Tozzl and a feed populates for your students to see. Want students to view a video and respond? Tozzl has a place to upload YouTube links, photos and more. Watch this video for a tutorial.
Plickers
Plickers is a classroom polling system which can display results in real time. The only materials you'll need to get started are paper, a printer, and a smartphone or tablet. Check out this video to see how Plickers can be used in your classroom.

Monday, April 6, 2015

Tuesday, March 3, 2015
Different First Page Header in Google Docs!
 For those who want to abide by MLA and APA rules, Google
made an update that you’ll want to know about.
Now, you can easily create a first page that has a different header than
the rest of your paper.
For those who want to abide by MLA and APA rules, Google
made an update that you’ll want to know about.
Now, you can easily create a first page that has a different header than
the rest of your paper.
Start by creating a new document.
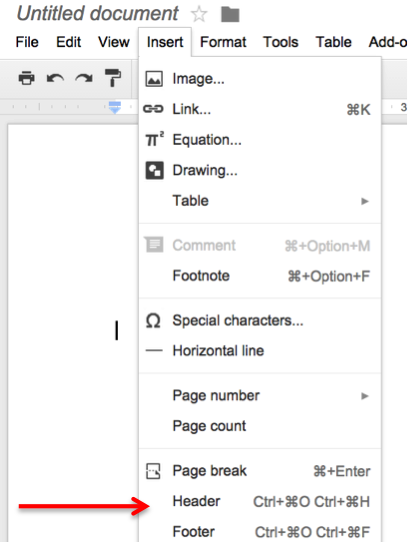
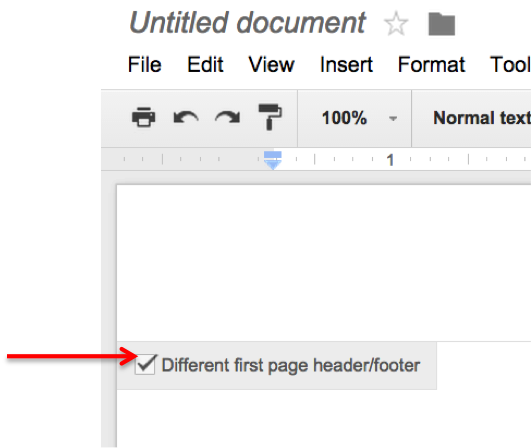 Next, go to INSERT and choose HEADER.
Put whatever header you want on the first page OR leave it blank.
When you get to the second page, double click the header
section, and type your information.
Done!
Friday, February 20, 2015
Track Changes in Google Docs
For those who spend any time creating documents online, track changes is a must-have! For collaborative projects, peer edits and more, track changes lets you see the edits that others make to your document. Then, it lets you decide if you want to accept/reject/continue editing them.
 While Google added this feature last year, they DID NOT call it "track changes" like their MS Word competitors. Instead, it's called "suggesting".
Here's how to activate it in Google Docs:
Click on EDITING in the toolbar. Choose SUGGESTING.
Be sure to ask those with whom you're collaborating to do the same thing.
Be sure to ask those with whom you're collaborating to do the same thing.
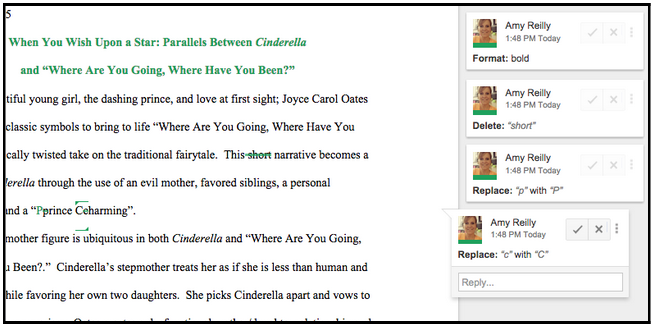
When you’ve done this, any changes that are made on the document are recorded out to the right. Click the check to accept, the x to delete and the horizontal dots for more revision.

Another great tool available in Google Docs is the SEE REVISION HISTORY tool. Find it by clicking on FILE and choosing it from the menu. This feature allows owners of the document to not only track changes, but the ability to restore a previous version.
This feature is also priceless for teachers who have students working in collaborative groups. It allows teachers to see who has been working on the document, which in turn helps with accountability.
Thursday, February 19, 2015
Padlet: An Oldie But A Goodie
Technology has given students the ability to share information globally. Collaboration opportunities are everywhere, and Padlet is just one way to communicate, express ideas and share information with peers.
Padlet, a user-friendly website is a "wall" where students can post content, thoughts, videos and pictures. It is accessible from any device with an internet connection, so creating or adding to a Padlet can be done any time, anywhere.
Padlets can be shared, embedded, and downloaded into PDFs, Excel sheets and jpegs. And of course, as a huge fan of all things Google, I was thrilled when I found the Padlet Chrome extension, which allows users to share content directly with a wall they have created. That. Is. Awesome! But wait, there's more! With Padlet, you have infinite space. Keep double clicking and the screen will adjust.
Nervous about everyone adhering to proper netiquette which using Padlet? Visibility of the walls you create are completely customizable. In addition, as the administrator of your wall, you can moderate comments and posts.
There are SO many ways to use this tool in the classroom. Below you'll see a Padlet that gives ideas to get you started. Feel free to add!
Padlet, a user-friendly website is a "wall" where students can post content, thoughts, videos and pictures. It is accessible from any device with an internet connection, so creating or adding to a Padlet can be done any time, anywhere.
Padlets can be shared, embedded, and downloaded into PDFs, Excel sheets and jpegs. And of course, as a huge fan of all things Google, I was thrilled when I found the Padlet Chrome extension, which allows users to share content directly with a wall they have created. That. Is. Awesome! But wait, there's more! With Padlet, you have infinite space. Keep double clicking and the screen will adjust.
Nervous about everyone adhering to proper netiquette which using Padlet? Visibility of the walls you create are completely customizable. In addition, as the administrator of your wall, you can moderate comments and posts.
There are SO many ways to use this tool in the classroom. Below you'll see a Padlet that gives ideas to get you started. Feel free to add!

Wednesday, February 18, 2015
Cool, EASY Online Movie Making Site
There
are a myriad of options when students want to make movies in the classroom.
An easy, FREE option is by using the website Zimmer Twins.
It's a free website (for a regular account) where students can create
quick, 60 second movies. Appropriate for 1st grade and above, students will be engaged and will enjoy being able to make a finished product so quickly. By clicking here, you will find lesson plan ideas and more information for teachers.
Common Sense Media's take on
Zimmer Twins:
This imaginative movie-making site lets users create animated
short films using predetermined characters, expressions, actions, and
backgrounds. Users can fill movie frames with still drawings, speech bubbles,
and transitional words (such as “Meanwhile…”), then string them together to
create their very own custom animated movie. It’s simple to make a movie from
scratch or complete pre-designed starter films.
Here's
an overview on account setup and use:
These technology standards are met with
this project:
ISTE National Education Technology
Standards:
1. Creativity and Innovation- Students demonstrate creative thinking, construct knowledge, and develop innovative products and processes using technology.
2. Critical Thinking, Problem Solving, and Decision Making- Students use critical thinking skills to plan and conduct research, manage projects, solve problems, and make informed decisions using appropriate digital tools and resources.
3. Technology Operations and Concepts- Students demonstrate a sound understanding of technology concepts, systems, and operations.
1. Creativity and Innovation- Students demonstrate creative thinking, construct knowledge, and develop innovative products and processes using technology.
2. Critical Thinking, Problem Solving, and Decision Making- Students use critical thinking skills to plan and conduct research, manage projects, solve problems, and make informed decisions using appropriate digital tools and resources.
3. Technology Operations and Concepts- Students demonstrate a sound understanding of technology concepts, systems, and operations.
Want to see an example of a Zimmer Twin learning about the Cotton Gin? Click here.
Friday, January 9, 2015
Making YouTube Videos on the Fly
I am in a tech integration workshop, my monthly therapy, and learned that by going to YouTube, clicking on UPLOAD once you've logged in to your account, you can make a video on the fly. Once there, you can choose RECORD VIDEO and boom - you're recording! *Note: it starts recording RIGHT AWAY (no countdown) so be prepared. This is super cool and has a ton of possibilities. Try making one today and share in the comments below.
Thursday, January 8, 2015
Google Classroom Tutorial
In an effort to reach more staff for professional learning, this month's Tech Wednesday went digital with a webinar introducing Google Classroom to those who have yet to use it.
Tuesday, January 6, 2015
AirScanner: A Handy Tool
 AirScanner is a handy tool that, quite honestly, I didn't even remember downloading. I tend to hit places like Appsgonefree to download apps that look promising. I'm glad I chose this one.
AirScanner turns your cell phone into a document camera. Why is this great? Well, typically the document cameras in teachers' rooms are wired and must be plugged in to the computer. This is a wireless version. This is a fantastic tool to use when you want to show hard copies of documents, newspapers, magazines and more. In addition, it's a great way to showcase student work. Since you're no longer tied to your wired document camera, you can show images, manipulatives and other student produced items as they are working. Pretty neat, right?
How To
After downloading the app:
- Start Air Scanner
- See the numbered IP address at the bottom of your camera display (looks something like this - 192.168.0.5:8283)
- Open your browser (Chrome, Safari, Firefox) on your computer and type in the IP address EXACTLY as it's shown.
You're on your way!
It can be a tad laggy (taking about 2 seconds to show the image), but it's definitely worth a look. At .99 cents, it's very reasonable or you can haunt AppsGoneFree until it comes around again. Download it here for iOS.
Monday, December 8, 2014
Gmail +1 for Elementary Accounts
This great tip comes from Practical EdTech and it's a winner! It shows a workaround for websites that not only require an email address, but require verification of that email address. This is problematic for students in lower grades because while they have email addresses, the ability to send and receive mail is turned off for K - 6. Check out the steps below that outline Gmail+1. It's quick, easy and allows the teacher to control the accounts.
Elementary school teachers often ask me how their students can use services that require email addresses when the students don’t have email addresses. The solution is to use Gmail+1. Here’s how Gmail+1 works. Let’s say there’s a new service that I want my students to use but my students don’t have email addresses that they can use to register for that service. In that case I can quickly generate Gmail addresses for my students by using the Gmail+1 strategy.
Here’s how the Gmail+1 trick works:
1. Create a new Gmail account just for your class. Example mrbyrnesclass@gmail.com
2. Issue email addresses to students as follows mrbyrnesclass+1@gmail.com, mrbyrnesclass+2@gmail.com
3. Gmail overrides the “1″ and “2″ at the end of the mrbyrnesclass and sends all emails to the inbox at mrbyrnesclass@gmail.com however almost all other services that require an email for registration will recognize mrbyrnesclass+1@gmail.com as distinct from mrbyrnesclass@gmail.com
4. Students can use the “+1″ emails to register for services, but I get to see all of the emails coming and going.
5. Because of #4 above I may have to confirm all of my students’ registrations on a new service.
Disclaimers:
1. This hack doesn’t work on every service so your mileage may vary.
2. Don’t give students the password to the class email address (in the example above I would not give students the password to mrbyrnesclass@gmail.com) because if they have it they could all send and receive email from the account. The passwords that they choose on the services that they register for should all be unique and they should not share them with each other.
Friday, December 5, 2014
It's Time for the HOUR OF CODE!
It’s that time of year again, folks! The Hour of Code is upon us. The grassroots campaign goal is for tens of millions of students to try an Hour of Code during December 8-14, 2014, in celebration of Computer Science Education Week. Is it one specific hour? No. You can do the Hour of Code anytime during this week. (And if you can't do it during that week, do it the week before or after).
90 percent of American schools don’t teach computer science. Fewer students are learning how computers work than a decade ago. Girls and minorities are severely underrepresented. And yet, technology is increasingly shaping almost every aspect of how we live our lives.
Why should you participate in Hour of Code?
While all of us know that it’s important for students to learn how to navigate today’s tech-saturated world, many teachers aren’t experienced in computer science and don’t know where to start. This event is a chance for all of us to see what computer science is about.
Hopefully it’ll spark interest in students to keep learning. Research also shows that kids pick up programming concepts before they know how to read and write. In fact, their brains are more receptive to computer languages at a young age, just like foreign languages.
Why is it important?
 In China, every students takes computer science to graduate high school. In the U.S., 90 percent of schools don’t even teach it. It’s time for us to catch up to the 21st century. We know that regardless of what our students do when they grow up, whether they go into medicine, business, politics, or the arts, knowing how to build technology will allow give them the confidence and know-how to succeed.
The Hour of Code is for all ages. Here are multiple sites from which to choose activities and tutorials:
Click on the pictures to view tutorials that will have your students (and you) writing code in no time.
- The first website takes you to code based learning that has a theme that EVERYONE loves this year, Frozen. Help Elsa and Anna and learn code along the way. There are many other tutorials available at this website.
- The next picture has code for all levels for pre-readers to high school. It's definitely worth a look.
- Made W/ Code has kids writing code that will light the Christmas tree at the White House! Write your code, sign up for a specific time and tune in live via the net to see your lighting sequence on the tree! How cool is that?
- Next is SCRATCH. Scratch is a programming language and online community where you can create your own interactive stories, games, and animations -- and share your creations with others around the world. In the process of designing and programming Scratch projects, young people learn to think creatively, reason systematically, and work collaboratively.
- Lightbot is great fun and does a surprisingly thorough job of introducing some pretty complex principles of programming. Lightbot offers an easy way for kids to learn concepts like loops, if-then statements, and the like without typing or coding.



Tips on "hosting" an hour of code:
- Check out the tutorials and pick one for your class. Tutorials will be available in as many as 20 languages.
- Go through the tutorial yourself so you can help students during the Hour of Code.
- Test tutorials on student computers or devices. Make sure they work properly (with sound and video).
- Preview the congrats page to see what students will see when they finish.
- If the tutorial you choose works best with sound, provide headphones for your class, or ask students to bring their own.
Thursday, November 6, 2014
Google Chrome: You'll Love It!
Everyone knows I fell in love with Google a long time ago. What's great is that our "relationship" continues to flourish as Google products just seem to get better and better as time goes on.
I've discussed Google Chrome before on the Technology Toolbox website. I like the browser because it's fast, secure and I can personalize it in a myriad of ways. In addition, I can have my bookmarks, extensions and apps on any computer I use when I log in to the browser. That is a huge plus! Top10Reviews reported that:
Another reason for teachers in our district to use Google Chrome is compatibility. If you use Hutchdocs, Google Classroom etc., they work better in Chrome because they all have the same creator - Google .
The bottom line is, that if used correctly, Chrome can help you with your productivity, connectivity and will provide tools to help you differentiate for your students (SpeakIt, Yellow Highlighter, and Awersome Screenshot Capture/Annotate to name a few). I've been a teacher long enough to know that the proof is in the pudding. So here is a presentation explaining the "how to" behind Chrome settings and extensions, and links to great extensions for educators. My favorites are highlighted.
Have a favorite extension or app you're using in the classroom? Please share it in the comments below.
I've discussed Google Chrome before on the Technology Toolbox website. I like the browser because it's fast, secure and I can personalize it in a myriad of ways. In addition, I can have my bookmarks, extensions and apps on any computer I use when I log in to the browser. That is a huge plus! Top10Reviews reported that:
Google has taken initiative in making Chrome very compatible with the internet. Chrome was specifically designed to quickly and efficiently load, display and interact with the vast array of applications on the web, boasting a built-in Flash and PDF reader. The synchronization between your smartphone and your desktop browser makes saving favorites and making bookmarks a seamless process. Most internet browsers are built for function over form, but Google Chrome succeeds in both. The layout is clean, intuitive and well organized, and Chrome manages a level of simplicity other internet browsers lack. Its features are clearly designed for efficiency and ease of use, and you can search and navigate from the same box. Furthermore, the browser allows you to conveniently create shortcuts to web applications you regularly use, which you can place on your desktop for quick and easy access.
The bottom line is, that if used correctly, Chrome can help you with your productivity, connectivity and will provide tools to help you differentiate for your students (SpeakIt, Yellow Highlighter, and Awersome Screenshot Capture/Annotate to name a few). I've been a teacher long enough to know that the proof is in the pudding. So here is a presentation explaining the "how to" behind Chrome settings and extensions, and links to great extensions for educators. My favorites are highlighted.
Have a favorite extension or app you're using in the classroom? Please share it in the comments below.
Subscribe to:
Posts (Atom)